本篇文章的主要目的是对上一篇文章已经搭建好的网络进一步丰富其内容,具体体现在6个方面:
回顾:tf.keras搭建神经网络八股——六步法
- import——导入所需的各种库和包
- x_train, y_train——导入数据集、自制数据集、数据增强
- model=tf.keras.models.Sequential
/class MyModel(Model) model=MyModel——定义模型 - model.compile——配置模型
- model.fit——训练模型、断点续训
- model.summary——参数提取、acc/loss 可视化、前向推理实现应用
1.加载自己制作的训练集
代码:
import tensorflow as tf
from PIL import Image
import numpy as np
import os

train_path = './mnist_image_label/mnist_train_jpg_60000/'
train_txt = './mnist_image_label/mnist_train_jpg_60000.txt'
x_train_savepath = './mnist_image_label/mnist_x_train.npy'
y_train_savepath = './mnist_image_label/mnist_y_train.npy'

test_path = './mnist_image_label/mnist_test_jpg_10000/'
test_txt = './mnist_image_label/mnist_test_jpg_10000.txt'
x_test_savepath = './mnist_image_label/mnist_x_test.npy'
y_test_savepath = './mnist_image_label/mnist_y_test.npy'


def generateds(path, txt):
    f = open(txt, 'r')  # 以只读形式打开txt文件
    contents = f.readlines()  # 读取文件中所有行
    f.close()  # 关闭txt文件
    x, y_ = [], []  # 建立空列表
    for content in contents:  # 逐行取出
        # 因为数据是2028_7.jpg 7,中间会有一个空格,下面这句话就是把图片x和结果y分开
        value = content.split()  # 以空格分开,图片路径为value[0] , 标签为value[1] , 存入列表,以空格为分隔符,包含 \n
        img_path = path + value[0]  # 拼出图片路径和文件名
        # 字符串的加法path + value[0]就是./mnist_image_label/mnist_test_jpg_10000/+2028_7.jpg,
        # img_path就是'./mnist_image_label/mnist_test_jpg_10000/2028_7.jpg'
        img = Image.open(img_path)  # 读入图片
        #  模式“L”
        #  为灰色图像,它的每个像素用8个bit表示,0表示黑,255表示白,其他数字表示不同的灰度。
        # 在PIL中,从模式“RGB”转换为“L”模式是按照下面的公式转换的:
        img = np.array(img.convert('L'))  # 图片变为8位宽灰度值的np.array格式
        img = img / 255.  # 数据归一化 (实现预处理)
        x.append(img)  # 归一化后的数据,贴到列表x

        y_.append(value[1])  # 标签贴到列表y_
        print('loading : ' + content)  # 打印状态提示

    x = np.array(x)  # 变为np.array格式
    y_ = np.array(y_)  # 变为np.array格式
    y_ = y_.astype(np.int64)  # 变为64位整型
    return x, y_  # 返回输入特征x,返回标签y_


if os.path.exists(x_train_savepath) and os.path.exists(y_train_savepath) and os.path.exists(
        x_test_savepath) and os.path.exists(y_test_savepath):
    print('-------------Load Datasets-----------------')
    x_train_save = np.load(x_train_savepath)
    y_train = np.load(y_train_savepath)
    x_test_save = np.load(x_test_savepath)
    y_test = np.load(y_test_savepath)
    x_train = np.reshape(x_train_save, (len(x_train_save), 28, 28))
    x_test = np.reshape(x_test_save, (len(x_test_save), 28, 28))
else:
    print('-------------Generate Datasets-----------------')
    x_train, y_train = generateds(train_path, train_txt)
    x_test, y_test = generateds(test_path, test_txt)

    print('-------------Save Datasets-----------------')
    x_train_save = np.reshape(x_train, (len(x_train), -1))
    x_test_save = np.reshape(x_test, (len(x_test), -1))
    np.save(x_train_savepath, x_train_save)
    np.save(y_train_savepath, y_train)
    np.save(x_test_savepath, x_test_save)
    np.save(y_test_savepath, y_test)

model = tf.keras.models.Sequential([
    tf.keras.layers.Flatten(),
    tf.keras.layers.Dense(128, activation='relu'),
    tf.keras.layers.Dense(10, activation='softmax')
])

model.compile(optimizer='adam',
              loss=tf.keras.losses.SparseCategoricalCrossentropy(from_logits=False),
              metrics=['sparse_categorical_accuracy'])

model.fit(x_train, y_train, batch_size=32, epochs=5, validation_data=(x_test, y_test), validation_freq=1)
model.summary()
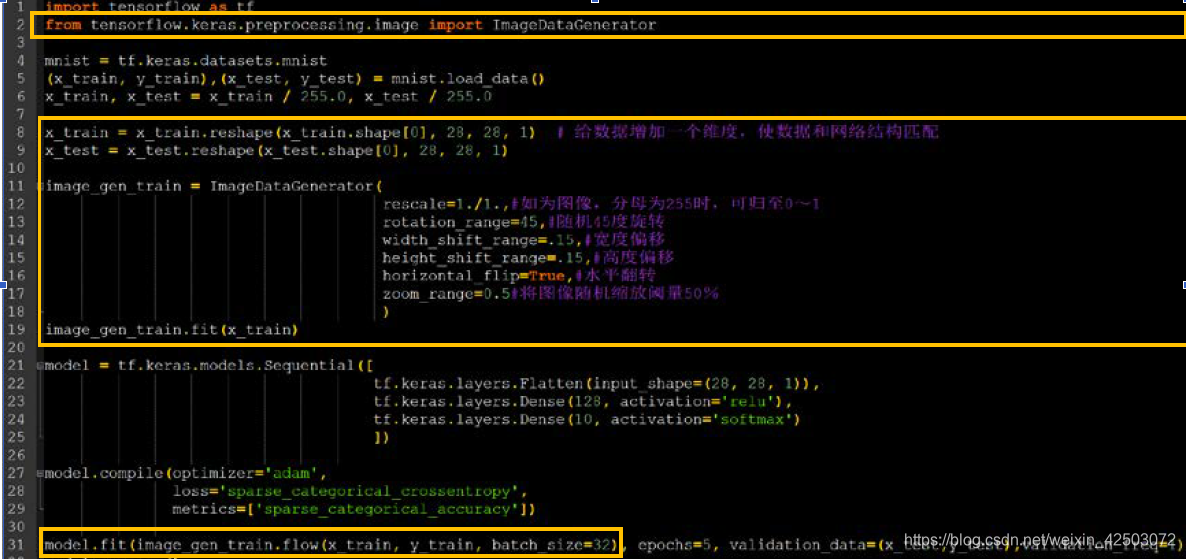
2.数据增强
函数介绍
 Image_gen_train = tf.keras.preprocessing.image.ImageDataGenerator(
 	Rescale = 所有数据将乘以该数值
 	Rotation_range = 随机旋转角度数范围
 	Width_shift_range = 随机宽度偏移量
 	Height_shift_range = 随机高度偏移量
 	水平翻转:horizontal_flip = 是否随机水平翻转
 	随机缩放:zoom_range = 随机缩放的范围[1-n,1+n]
 )
 Image_gen_train.fit(x_train)
代码
import tensorflow as tf
from tensorflow.keras.preprocessing.image import ImageDataGenerator

mnist = tf.keras.datasets.mnist
(x_train, y_train), (x_test, y_test) = mnist.load_data()
x_train, x_test = x_train / 255.0, x_test / 255.0
x_train = x_train.reshape(x_train.shape[0], 28, 28, 1)  # 给数据增加一个维度,从(60000, 28, 28)reshape为(60000, 28, 28, 1)

image_gen_train = ImageDataGenerator(
    rescale=1. / 1.,  # 如为图像,分母为255时,可归至0~1
    rotation_range=45,  # 随机45度旋转
    width_shift_range=.15,  # 宽度偏移
    height_shift_range=.15,  # 高度偏移
    horizontal_flip=False,  # 水平翻转
    zoom_range=0.5  # 将图像随机缩放阈量50%
)
image_gen_train.fit(x_train)

model = tf.keras.models.Sequential([
    tf.keras.layers.Flatten(),
    tf.keras.layers.Dense(128, activation='relu'),
    tf.keras.layers.Dense(10, activation='softmax')
])

model.compile(optimizer='adam',
              loss=tf.keras.losses.SparseCategoricalCrossentropy(from_logits=False),
              metrics=['sparse_categorical_accuracy'])

model.fit(image_gen_train.flow(x_train, y_train, batch_size=32), epochs=5, validation_data=(x_test, y_test),
          validation_freq=1)
model.summary()
相对于baseline多的
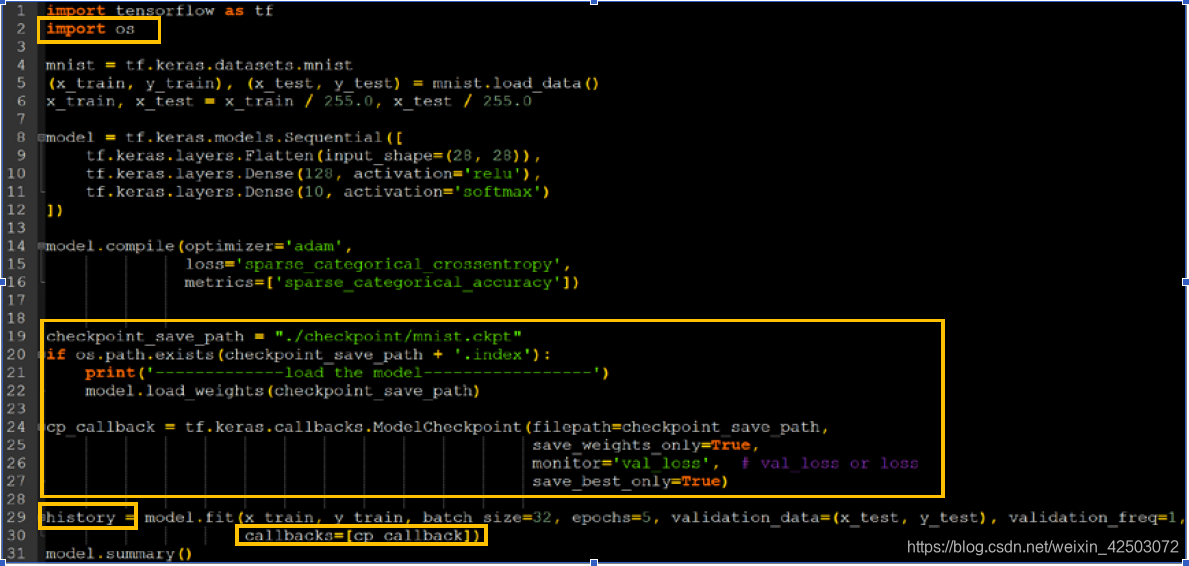
3.断点续训
a. 读取模型:
 函数:load_weights(路径文件名)
 例子:
 	checkpoint_save_path = "./checkpoint/mnist.ckpt"
 	if os.path.exists(checkpoint_save_path + '.index'):
 		print("--------------load the model---------------")
 		model.load_weights(checkpoint_save_path)
b. 保存模型:
 函数:
 	tf.keras.callbacks.ModelCheckpoint(
 		filepath = 路径文件名,
 		save_weights_only = True/False,
 		save_best_only = True/False
 	)
 	history = mlodel.fit(callbacks = [cp_callback])
 例子:
 	cp_callback = tf.keras.callbacks.ModelCheckpoint(
 		filepath = checkpoint_save_path,
 		save_weights_only = True,
 		save_best_only = True)
 	history = model.fit(x_train,y_train,batch_size=32,epochs=5,validation_data=(x_test,y_test),validation_freq=1,callbacks = [cp_callback])
代码:
import tensorflow as tf
import os


mnist = tf.keras.datasets.mnist
(x_train,y_train),(x_test,y_test) = mnist.load_data()
x_train,x_test = x_train / 255.0,x_test / 255.0

model = tf.keras.models.Sequential([
    tf.keras.layers.Flatten(),
    tf.keras.layers.Dense(128,activation = 'relu'),
    tf.keras.layers.Dense(10,activation = 'softmax')
])

model.compile(optimizer = 'adam',
             loss = tf.keras.losses.SparseCategoricalCrossentropy(from_logits = False),
             metrics = ['sparse_categorical_accuracy'])

checkpoint_save_path = "./checkpoint/mnist.ckpt"
if os.path.exists(checkpoint_save_path + '.index'):
    print("--------------load the model---------------")
    model.load_weights(checkpoint_save_path)

cp_callback = tf.keras.callbacks.ModelCheckpoint(
    filepath = checkpoint_save_path,
    save_weights_only = True,
    save_best_only = True)
history = model.fit(x_train,y_train,batch_size=32,epochs=5,validation_data=(x_test,y_test),validation_freq=1,callbacks = [cp_callback])
model.summary()
相对于baseline多的
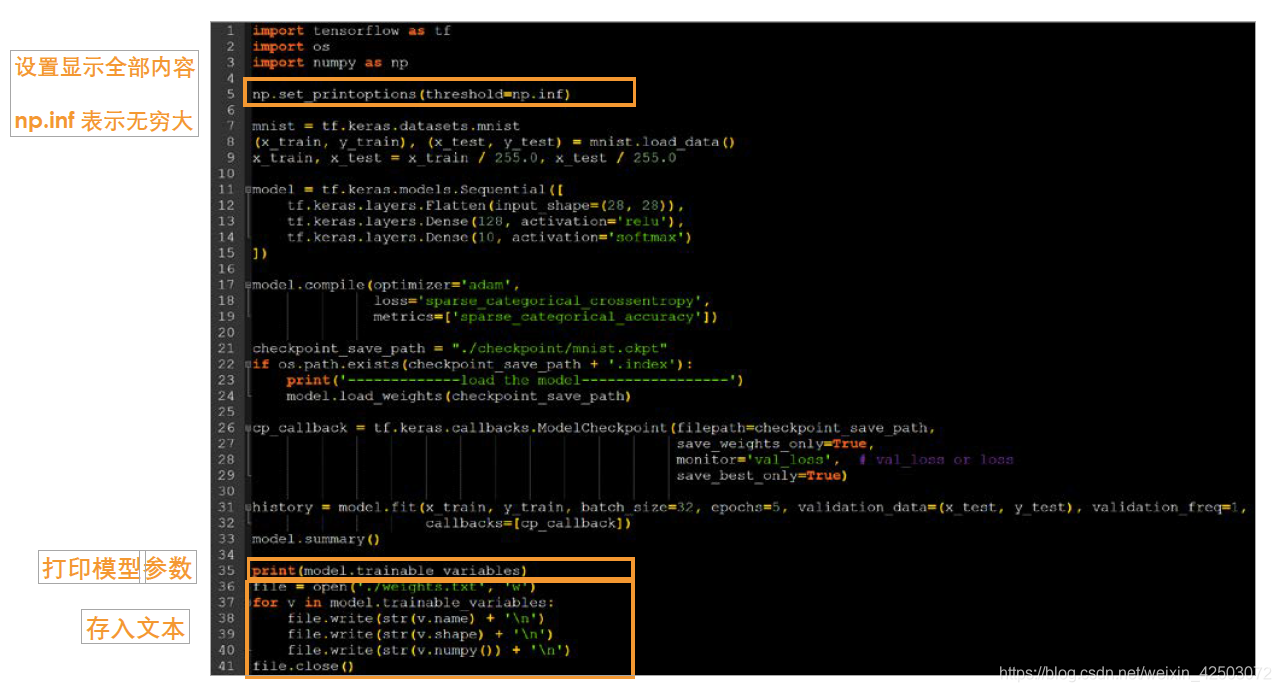
4. 参数提取
- 提取可训练参数
model.trainable_variables 模型中可训练的参数 - 设置print输出格式
np.set_printoptions(precision=小数点后按四舍五入保留几位,threshold=数组元素数量少于或等于门槛值,打印全部元素;否则打印门槛值+1 个元素,中间用省略号补充)
代码
import tensorflow as tf
import os
import numpy as np
np.set_printoptions(threshold=np.inf) # 设置print的函数的打印效果为无限
mnist = tf.keras.datasets.mnist
(x_train, y_train), (x_test, y_test) = mnist.load_data()
x_train, x_test = x_train / 255.0, x_test / 255.0
model = tf.keras.models.Sequential([
    tf.keras.layers.Flatten(),
    tf.keras.layers.Dense(128, activation='relu'),
    tf.keras.layers.Dense(10, activation='softmax')
])
model.compile(optimizer='adam',
              loss=tf.keras.losses.SparseCategoricalCrossentropy(from_logits=False),
              metrics=['sparse_categorical_accuracy'])
checkpoint_save_path = "./checkpoint/mnist.ckpt"
if os.path.exists(checkpoint_save_path + '.index'):
    print('-------------load the model-----------------')
    model.load_weights(checkpoint_save_path)
cp_callback = tf.keras.callbacks.ModelCheckpoint(filepath=checkpoint_save_path,
                                                 save_weights_only=True,
                                                 save_best_only=True)
history = model.fit(x_train, y_train, batch_size=32, epochs=5, validation_data=(x_test, y_test), validation_freq=1,
                    callbacks=[cp_callback])
model.summary()
# model.trainable_variables返回当前模型中所以可训练参数
# 打印出所有可训练参数
print(model.trainable_variables)
file = open('./weights.txt', 'w')
# 利用for循环把所有可训练参数存入文本
for v in model.trainable_variables:
    file.write(str(v.name) + '\n')
    file.write(str(v.shape) + '\n')
    file.write(str(v.numpy()) + '\n')
file.close()
相对于断点续训多的
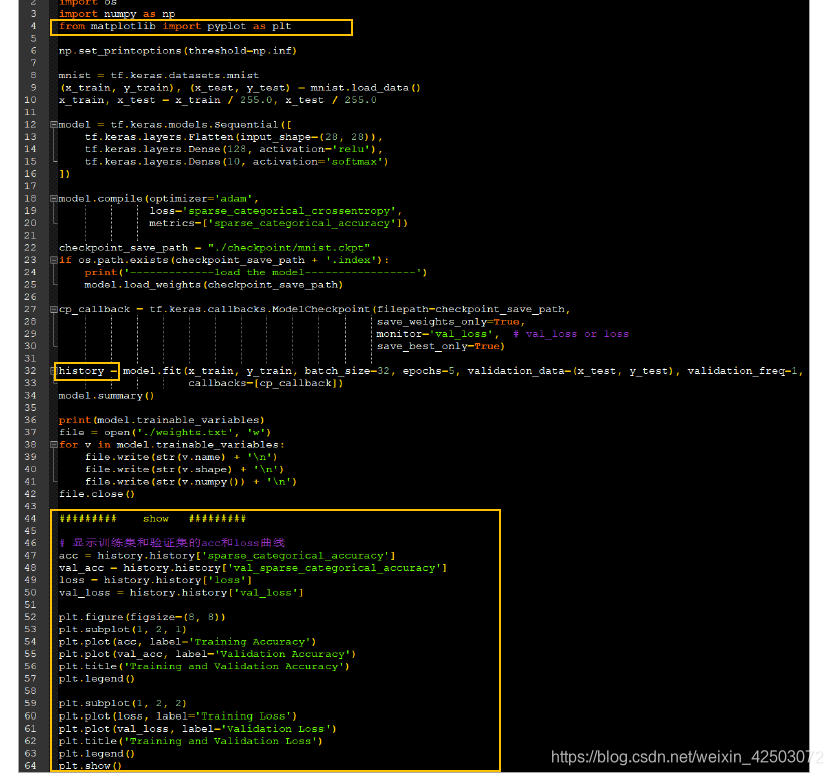
5.acc/loss可视化
- history
history=model.fit(训练集数据, 训练集标签, batch_size=, epochs=, validation_split=用作测试数据的比例,validation_data=测试集, validation_freq=测试频率) - history包含得出的结果:
loss:训练集 loss
val_loss:测试集 loss
sparse_categorical_accuracy:训练集准确率
val_sparse_categorical_accuracy:测试集准确率

示例

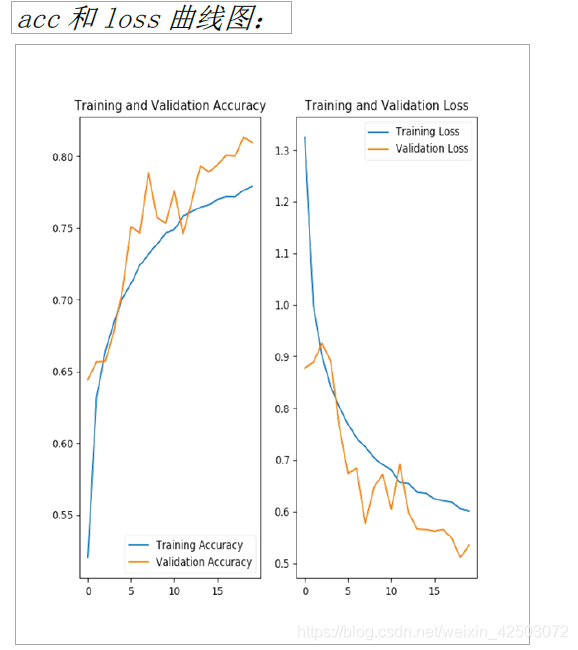
图中的说明两条线表示的内容的操作由plt.legend() 完成。
代码
import tensorflow as tf
import os
import numpy as np
from matplotlib import pyplot as plt

np.set_printoptions(threshold=np.inf)  # 设置print的函数的打印效果为无限

mnist = tf.keras.datasets.mnist
(x_train, y_train), (x_test, y_test) = mnist.load_data()
x_train, x_test = x_train / 255.0, x_test / 255.0

model = tf.keras.models.Sequential([
    tf.keras.layers.Flatten(),
    tf.keras.layers.Dense(128, activation='relu'),
    tf.keras.layers.Dense(10, activation='softmax')
])

model.compile(optimizer='adam',
              loss=tf.keras.losses.SparseCategoricalCrossentropy(from_logits=False),
              metrics=['sparse_categorical_accuracy'])

checkpoint_save_path = "./checkpoint/mnist.ckpt"
if os.path.exists(checkpoint_save_path + '.index'):
    print('-------------load the model-----------------')
    model.load_weights(checkpoint_save_path)

cp_callback = tf.keras.callbacks.ModelCheckpoint(filepath=checkpoint_save_path,
                                                 save_weights_only=True,
                                                 save_best_only=True)

history = model.fit(x_train, y_train, batch_size=32, epochs=5, validation_data=(x_test, y_test), validation_freq=1,
                    callbacks=[cp_callback])
model.summary()
# model.trainable_variables返回当前模型中所以可训练参数
# 打印出所有可训练参数
print(model.trainable_variables)
file = open('./weights.txt', 'w')
# 利用for循环把所有可训练参数存入文本
for v in model.trainable_variables:
    file.write(str(v.name) + '\n')
    file.write(str(v.shape) + '\n')
    file.write(str(v.numpy()) + '\n')
file.close()

###############################################    show   ###############################################

# 显示训练集和验证集的acc和loss曲线
acc = history.history['sparse_categorical_accuracy']
val_acc = history.history['val_sparse_categorical_accuracy']
loss = history.history['loss']
val_loss = history.history['val_loss']

plt.subplot(1, 2, 1)
plt.plot(acc, label='Training Accuracy')
plt.plot(val_acc, label='Validation Accuracy')
plt.title('Training and Validation Accuracy')
plt.legend() # 给出图例,这句话作用就是给图中两个线作说明

plt.subplot(1, 2, 2)
plt.plot(loss, label='Training Loss')
plt.plot(val_loss, label='Validation Loss')
plt.title('Training and Validation Loss')
plt.legend()
plt.show()
多出部分
6.给图识物(也就是前向传播的应用)
-
调用函数:predict(输入特征,batch_size=整数) 返回前向传播的计算结果
-
步骤:
 a. 浮现模型
 	model = tf.keras.models.Sequential([
 	    tf.keras.layers.Flatten(),
 	    tf.keras.layers.Dense(128, activation='relu'),
 	    tf.keras.layers.Dense(10, activation='softmax')])
 b. 加载参数
 	model.load_weights(model_save_path)
 c. 预测结果
 	result = model.predict(x_predict)
代码解释
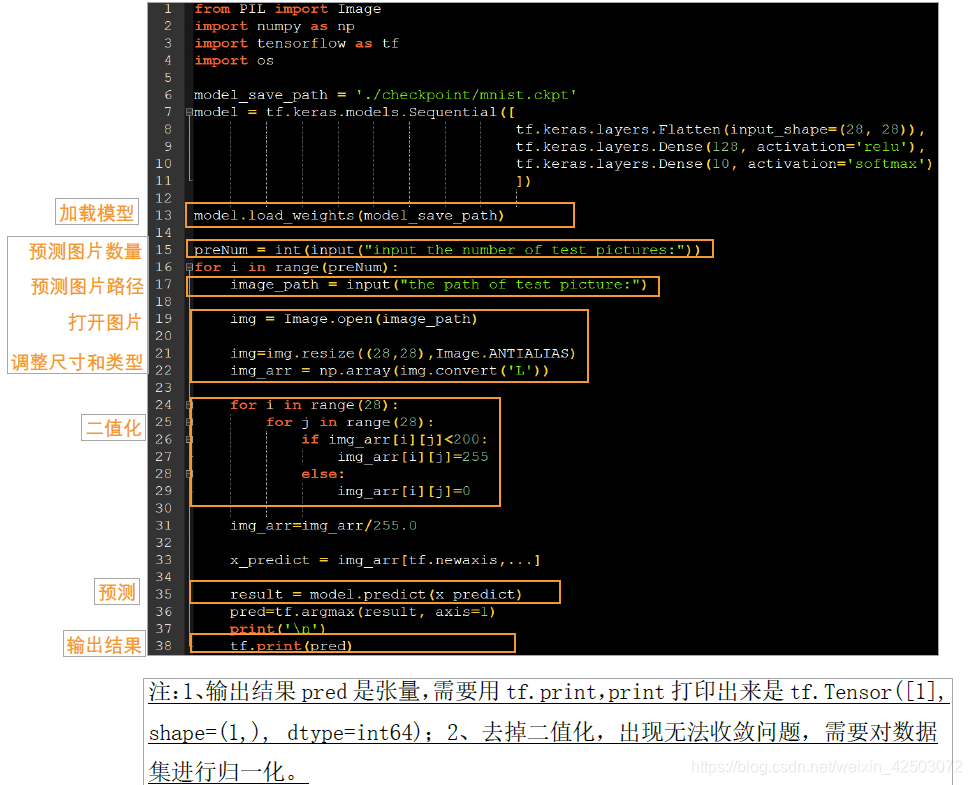
代码
from PIL import Image
import numpy as np
import tensorflow as tf

model_save_path = './checkpoint/mnist.ckpt'

model = tf.keras.models.Sequential([
    tf.keras.layers.Flatten(),
    tf.keras.layers.Dense(128, activation='relu'),
    tf.keras.layers.Dense(10, activation='softmax')])

model.load_weights(model_save_path)

preNum = int(input("input the number of test pictures:"))

for i in range(preNum):
    image_path = input("the path of test picture:")
    img = Image.open(image_path)
    img = img.resize((28, 28), Image.ANTIALIAS)
    img_arr = np.array(img.convert('L'))

    for i in range(28):
        for j in range(28):
            if img_arr[i][j] < 200:
                img_arr[i][j] = 255
            else:
                img_arr[i][j] = 0

    img_arr = img_arr / 255.0
    x_predict = img_arr[tf.newaxis, ...]
    result = model.predict(x_predict)

    pred = tf.argmax(result, axis=1)

    print('\n')
    tf.print(pred)
