一、目标
在centos7.6上安装部署zabbix5.0监控系统(无坑版)
本帖只写如何安装zabbix5.0、如何在web上添加被监控主机
二、拓扑说明
| IP | OS | Module | Roles |
| 10.1.1.10 | centos 7.6 | zabbix_server 5.0.5、MariaDB、Apache | zabbix server/agent(主服务器/客户端) |
| 10.1.1.20 | centos 7.6 | zabbix_proxy 5.0.5、MariaDB | zabbix proxy/agent(代理服务器/客户端--->发送数据给主服务器) |
| 10.1.1.101 | centos 7.6 | zabbix_agentd 5.0.5 | zabbix agent(客户端--->发送数据给代理服务器) |
| 10.1.1.201 | centos 7.6 | zabbix_agentd 5.0.5 | zabbix agent(客户端--->发送数据给主服务器) |
三、安装Mariadb数据库
啰嗦:当然你也可以安装mysql
1.在centos7.6上安装mariadb数据库
yum install mariadb-server mariadb -y
systemctl start mariadb
systemctl enable mariadb
2.初始化mariadb数据库
[root@zbxserver ~]# mysql_secure_installation
Enter current password for root (enter for none):  ##这里回车一次
Set root password? [Y/n] y  ##这里输入y并回车一次
New password:   ##这里输入一次root账号的密码,并回车一次。啰嗦,这里输入密码是不会显示的。
Re-enter new password:     ##这里再输入一次root账号的密码,并回车一次。
Password updated successfully!
Reloading privilege tables..
 ... Success!

Remove anonymous users? [Y/n] y  ##这里输入y并回车一次
 ... Success!

Disallow root login remotely? [Y/n] n  ##这里输入n并回车一次
 ... skipping.

By default, MariaDB comes with a database named 'test' that anyone can
access.  This is also intended only for testing, and should be removed
before moving into a production environment.

Remove test database and access to it? [Y/n] n  ##这里输入n并回车一次
 ... skipping.

Reload privilege tables now? [Y/n] y  ##这里输入y并回车一次
 ... Success!
Thanks for using MariaDB!
3.创建zabbix所需的数据库、用户
[root@zbxserver ~]# mysql -uroot -p
MariaDB [(none)]> create database zabbix character set utf8 collate utf8_bin;
MariaDB [(none)]> create user zabbix@localhost identified by '你的密码';
MariaDB [(none)]> grant all privileges on zabbix.* to zabbix@localhost;
MariaDB [(none)]> exit
注释:在上面第三行中的“你的密码”写上用户zabbix的数据库密码,等会要用到。
四、Zabbix5.0 server端的安装
啰嗦:本段只在server端10.1.1.10操作,除非有特殊说明
1.基础准备工作
systemctl stop firewalld
systemctl disable firewalld
setenforce 0
sed -i 's/SELINUX=enforcing/SELINUX=disabled/g' /etc/selinux/config

hostnamectl set-hostname zbxserver

mv /etc/yum.repos.d/CentOS-Base.repo /etc/yum.repos.d/CentOS-Base.repo.bak
wget -O /etc/yum.repos.d/CentOS-Base.repo http://mirrors.aliyun.com/repo/Centos-7.repo
2.安装并设置zabbix的yum源
啰嗦:你要直接使用zabbix官方的yum源的话,那你等着跳坑吧
2-1.安装zabbix源
rpm -Uvh https://repo.zabbix.com/zabbix/5.0/rhel/7/x86_64/zabbix-release-5.0-1.el7.noarch.rpm2-2.修改zabbix源地址为阿里云的zabbix镜像地址
vi /etc/yum.repos.d/zabbix.repo[zabbix]
name=Zabbix Official Repository - $basearch
baseurl=https://mirrors.aliyun.com/zabbix/zabbix/5.0/rhel/7/x86_64/
enabled=1
gpgcheck=0
gpgkey=file:///etc/pki/rpm-gpg/RPM-GPG-KEY-ZABBIX-A14FE591
[zabbix-frontend]
name=Zabbix Official Repository frontend - $basearch
baseurl=https://mirrors.aliyun.com/zabbix/zabbix/5.0/rhel/7/x86_64/frontend
enabled=1
gpgcheck=0
gpgkey=file:///etc/pki/rpm-gpg/RPM-GPG-KEY-ZABBIX-A14FE591
[zabbix-debuginfo]
name=Zabbix Official Repository debuginfo - $basearch
baseurl=https://mirrors.aliyun.com/zabbix/zabbix/5.0/rhel/7/x86_64/debuginfo/
enabled=1
gpgkey=file:///etc/pki/rpm-gpg/RPM-GPG-KEY-ZABBIX-A14FE591
gpgcheck=0
[zabbix-non-supported]
name=Zabbix Official Repository non-supported - $basearch
baseurl=https://mirrors.aliyun.com/zabbix/non-supported/rhel/7/x86_64/
enabled=1
gpgkey=file:///etc/pki/rpm-gpg/RPM-GPG-KEY-ZABBIX
gpgcheck=0注释:将zabbix官方的地址替换为阿里云的zabbix地址。
注意看下图圈中的地址,还有两个没圈住,debuginfo/ 和 frontend/

3.查看yum的列表中是否有了zabbix(可略)
yum list | grep zabbix注释:正常情况下会有一堆的zabbix开头的包
4.安装zabbix主服务和agent程序
yum install zabbix-server-mysql zabbix-agent -y5.安装SCL组件
yum install centos-release-scl zabbix-web-mysql-scl zabbix-apache-conf-scl -y6.导入初始架构和数据
zcat /usr/share/doc/zabbix-server-mysql*/create.sql.gz | mysql -uzabbix -p zabbix注释:系统将提示您输入新创建的密码
啰嗦:此时你可以去zabbix数据库中show tables;就能看到一大坨表。这样说明初始架构导入成功了。
7.修改zabbix server的主配置文件、修改数据库密码
cp /etc/zabbix/zabbix_server.conf{,.bak}
vi /etc/zabbix/zabbix_server.conf
将【DBPassword=】 修改为 【DBPassword=你的密码】。然后保存退出。
注释:这里的密码就是刚才设置的数据库用户zabbix的密码,要保持一致。
8.修改zabbix的前端页面的php时区
cp /etc/opt/rh/rh-php72/php-fpm.d/zabbix.conf{,.bak}
vi /etc/opt/rh/rh-php72/php-fpm.d/zabbix.conf
将【; php_value[date.timezone] = Europe/Riga】 修改为 【php_value[date.timezone] = Asia/Shanghai】。
注释:如果这行配置前面有#或者;,请删掉,然后保存退出即可。
9.启动zabbix server 及相关服务,并设置为开机自启
systemctl restart zabbix-server zabbix-agent httpd rh-php72-php-fpm
systemctl enable zabbix-server zabbix-agent httpd rh-php72-php-fpm
10.验证zabbix是否安装成功
[root@zbxserver ~]# netstat -ntlup |grep zabbix
tcp        0      0 0.0.0.0:10050           0.0.0.0:*               LISTEN      10753/zabbix_agentd
tcp        0      0 0.0.0.0:10051           0.0.0.0:*               LISTEN      16598/zabbix_server
tcp6       0      0 :::10050                :::*                    LISTEN      10753/zabbix_agentd
tcp6       0      0 :::10051                :::*                    LISTEN      16598/zabbix_server
注释:zabbix server使用的端口是10051,zabbix agent的端口是10050,这非常重要。
如果发现没有10050或者10051端口,那么请检查zabbix的日志。从日志中你将能很快定位问题点
tail -f /var/log/zabbix/zabbix_server.log
还可以使用命令mysql -u zabbix -p检查数据库是否正确。
11.初始化zabbix server 的页面
啰嗦:这里忘记截图了,蛋疼。
● 打开浏览器,输入地址【http://10.1.1.10/zabbix】
大概是第一页是zabbix的前端检查各个组件是否ok,必须全部是绿色打钩的。
然后输入数据库的密码,密码就是数据库用户zabbix的密码。
----下面见证奇迹的时刻到了!!!
● OMG,zabbix的前端页面也改成了这两年较流行的UI风格了,真骚

12.解决zabbix 5 页面出现乱码的情况
请参考另一篇帖子《Zabbix-05之将zabbix-web的乱码解决》,应该是类似的解决办法。这里仅仅提供思路。
注意:zabbix5的字体路径是/usr/share/zabbix/assets/fonts/,即将字体丢到这个目录里,然后修改配置文件/usr/share/zabbix/include/defines.inc.php里的两处含有【FONT_NAME】的字体从【graphfont】 改为 【msyh】

然后重启服务即可systemctl restart zabbix-server zabbix-agent httpd rh-php72-php-fpm
至此,zabbix 5.0 已经安装完成了。
五、在客户端服务器上安装zabbix agent
啰嗦:这里的客户端服务器指的就是拓扑结构里的10.1.1.101主机。
1.先按照本帖的【四-1,四-2,四-3】设置一遍。
但是,主机名就不要和zabbix server的重复了。
2.在centos客户端服务器上安装 zabbix agent程序
yum install zabbix-agent -y3.修改agent的配置文件zabbix_agentd.conf
cp /etc/zabbix/zabbix_agentd.conf{,.bak}
vim /etc/zabbix/zabbix_agentd.conf
● 修改 【Server=127.0.0.1】 修改为 【Server=10.1.1.10】,注:这里写zabbix server 的ip地址
● 修改 【ServerActive=127.0.0.1】 修改为 【ServerActive=10.1.1.10】,注,这里写zabbix server 的ip地址
● 修改【Hostname=Zabbix server】 修改为 【Hostname=xhost1】,注:可随便写
4.重启 zabbix agent服务,并设置为开机自启
systemctl restart zabbix-agent.service
systemctl enable zabbix-agent.service
5.检验客户端的agent是否安装成功
[root@zbxclient101 ~]# netstat -ntlup |grep zabbix
tcp        0      0 0.0.0.0:10050           0.0.0.0:*               LISTEN      21215/zabbix_agentd
tcp6       0      0 :::10050                :::*                    LISTEN      21215/zabbix_agentd
注:zabbix agent用的端口默认是10050,这点非常重要,记住了。
六、在zabbix server的dashboard上添加被监控主机
1.打开zabbix 的web页面
http://10.1.1.10/zabbix
2.创建主机组
点击左侧的【配置---主机群组】,再点右侧的【创建主机群组】
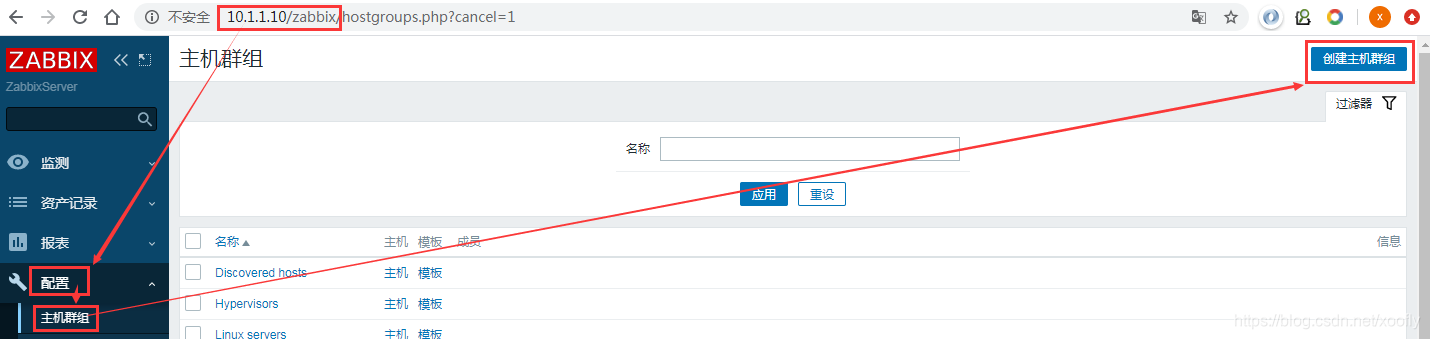
在【组名x】中输入主机的组名字,随便写,可以写中文哦。

3.创建主机
点击左侧的【配置---主机】,再点右侧的【创建主机】

填写主机参数:
a. 主机名称:xhost111 --->这里可随便写,不用与配置文件中的名字一样。
b. 群组: --->选择刚才你创建的那个群组
c. Interface---客户端:10.1.1.101 --->这里写呗监控端的ip地址
d. Interface---端口:10050
然后点上面的【模板】标签,我们接下来给这个主机添加一个监控模板

给这个主机添加一个合适的模板。最后点“更新or添加”

4.查看被监控主机列表

至此,主机已经添加到了zabbix上了。
------------------------------END--------------------2020年10月28日23:07:36------------------------------
写帖子非常耗时间,非常累,如果你觉得本帖对你起到帮助作用了,那么希望能得到你的打赏鼓励,以鼓励我继续分享更多干货给你,下篇帖子是《Zabbix-29之Zabbix5.0分布式监控的部署》。
