一、概述
该函数通过将使用 Sobel 算子计算的第二个 x 和 y 导数相加来计算源图像的拉普拉斯算子:

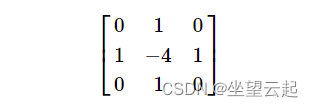
这在 ksize > 1 时完成。当 ksize == 1 时,通过使用以下 3×3 孔径过滤图像来计算拉普拉斯算子:
二、Laplacian函数
1、函数原型
cv::Laplacian (InputArray src, OutputArray dst, int ddepth, int ksize=1, double scale=1, double delta=0, int borderType=BORDER_DEFAULT)2、参数详解
| src | 源图像。 |
| dst | 与 src 大小和通道数相同的目标图像。 |
| ddepth | 目标图像的所需深度。 |
| ksize | 用于计算二阶导数滤波器的孔径大小。 有关详细信息,请参阅 getDerivKernels。 大小必须是正数和奇数。 |
| scale | 计算的拉普拉斯值的可选比例因子。 默认情况下,不应用缩放。 有关详细信息,请参阅 getDerivKernels。 |
| delta | 在将结果存储到 dst 之前添加到结果的可选增量值。 |
| borderType | 像素外推法,请参阅 BorderTypes。 不支持 BORDER_WRAP。 |
三、OpenCV源码
1、源码路径
opencv\modules\imgproc\src\deriv.cpp2、源码代码
void cv::Laplacian( InputArray _src, OutputArray _dst, int ddepth, int ksize,
                    double scale, double delta, int borderType )
{
    CV_INSTRUMENT_REGION();

    CV_Assert(!_src.empty());

    int stype = _src.type(), sdepth = CV_MAT_DEPTH(stype), cn = CV_MAT_CN(stype);
    if (ddepth < 0)
        ddepth = sdepth;
    _dst.create( _src.size(), CV_MAKETYPE(ddepth, cn) );

    if( ksize == 1 || ksize == 3 )
    {
        float K[2][9] =
        {
            { 0, 1, 0, 1, -4, 1, 0, 1, 0 },
            { 2, 0, 2, 0, -8, 0, 2, 0, 2 }
        };

        Mat kernel(3, 3, CV_32F, K[ksize == 3]);
        if( scale != 1 )
            kernel *= scale;

        CV_OCL_RUN(_dst.isUMat() && _src.dims() <= 2,
                   ocl_Laplacian3_8UC1(_src, _dst, ddepth, kernel, delta, borderType));
    }

    CV_IPP_RUN(!(cv::ocl::isOpenCLActivated() && _dst.isUMat()), ipp_Laplacian(_src, _dst, ksize, scale, delta, borderType));

    if( ksize == 1 || ksize == 3 )
    {
        float K[2][9] =
        {
            { 0, 1, 0, 1, -4, 1, 0, 1, 0 },
            { 2, 0, 2, 0, -8, 0, 2, 0, 2 }
        };
        Mat kernel(3, 3, CV_32F, K[ksize == 3]);
        if( scale != 1 )
            kernel *= scale;

        filter2D( _src, _dst, ddepth, kernel, Point(-1, -1), delta, borderType );
    }
    else
    {
        int ktype = std::max(CV_32F, std::max(ddepth, sdepth));
        int wdepth = sdepth == CV_8U && ksize <= 5 ? CV_16S : sdepth <= CV_32F ? CV_32F : CV_64F;
        int wtype = CV_MAKETYPE(wdepth, cn);
        Mat kd, ks;
        getSobelKernels( kd, ks, 2, 0, ksize, false, ktype );

        CV_OCL_RUN(_dst.isUMat(),
                   ocl_Laplacian5(_src, _dst, kd, ks, scale,
                                  delta, borderType, wdepth, ddepth))

        Mat src = _src.getMat(), dst = _dst.getMat();
        Point ofs;
        Size wsz(src.cols, src.rows);
        if(!(borderType&BORDER_ISOLATED))
            src.locateROI( wsz, ofs );
        borderType = (borderType&~BORDER_ISOLATED);

        const size_t STRIPE_SIZE = 1 << 14;
        Ptr<FilterEngine> fx = createSeparableLinearFilter(stype,
            wtype, kd, ks, Point(-1,-1), 0, borderType, borderType, Scalar() );
        Ptr<FilterEngine> fy = createSeparableLinearFilter(stype,
            wtype, ks, kd, Point(-1,-1), 0, borderType, borderType, Scalar() );

        int y = fx->start(src, wsz, ofs), dsty = 0, dy = 0;
        fy->start(src, wsz, ofs);
        const uchar* sptr = src.ptr() + src.step[0] * y;

        int dy0 = std::min(std::max((int)(STRIPE_SIZE/(CV_ELEM_SIZE(stype)*src.cols)), 1), src.rows);
        Mat d2x( dy0 + kd.rows - 1, src.cols, wtype );
        Mat d2y( dy0 + kd.rows - 1, src.cols, wtype );

        for( ; dsty < src.rows; sptr += dy0*src.step, dsty += dy )
        {
            fx->proceed( sptr, (int)src.step, dy0, d2x.ptr(), (int)d2x.step );
            dy = fy->proceed( sptr, (int)src.step, dy0, d2y.ptr(), (int)d2y.step );
            if( dy > 0 )
            {
                Mat dstripe = dst.rowRange(dsty, dsty + dy);
                d2x.rows = d2y.rows = dy; // modify the headers, which should work
                d2x += d2y;
                d2x.convertTo( dstripe, ddepth, scale, delta );
            }
        }
    }
}
四、效果图像示例


