本文介绍基于Spring AI如何实现MCP开发和调用。首先自定义了两个MCP Server,其中:一个是算术计算器MCP Server,并通过sdtio传输协议发布,另一个是天气预报MCP Server,通过sse传输协议发布。然后实现一个MCP Client,并调用阿里云qwen大模型完成整个 MCP 调用流程,并给出来整个示例的Java代码。
一、MCP是什么
模型上下文协议(即 Model Context Protocol,MCP)是一个开放协议,它规范了应用程序如何向大型语言模型(LLM)提供上下文。MCP 提供了一种统一的方式将 AI 模型连接到不同的数据源和工具,它定义了统一的集成方式。在开发智能体(Agent)的过程中,我们经常需要将将智能体与数据和工具集成,MCP 以标准的方式规范了智能体与数据及工具的集成方式,可以帮助您在 LLM 之上构建智能体(Agent)和复杂的工作流。目前已经有大量的服务接入并提供了 MCP server 实现,当前这个生态正在以非常快的速度不断的丰富中。

Spring AI MCP 采用模块化架构,包括以下组件:
(1)Spring AI 应用程序:使用 Spring AI 框架构建想要通过 MCP 访问数据的生成式 AI 应用程序。
(2)Spring MCP 客户端:MCP 协议的 Spring AI 实现,与服务器保持 1:1 连接。
(3)MCP 服务器:轻量级程序,每个程序都通过标准化的模型上下文协议公开特定的功能。
(4)本地数据源:MCP 服务器可以安全访问的计算机文件、数据库和服务。
(5)远程服务:MCP 服务器可以通过互联网(例如,通过 API)连接到的外部系统。
Spring AI MCP实现遵循三层架构:

(1)STDIO传输协议:STDIO方式是基于进程间通信,MCP Client和MCP Server运行在同一主机,主要用于本地集成、命令行工具等场景。
优点:
简单可靠,无需网络配置;适合本地部署场景;进程隔离,安全性好。
缺点:
仅支持单机部署;不支持跨网络访问;每个客户端需要独立启动服务器进程。
(2)SSE传输协议:SSE(Server-Sent Events)传输层是基于HTTP的单向通信机制,专门用于服务器向客户端推送数据。MCP Client远程调用MCP Server提供的SSE服务。实现客户端和服务端远程通信。
优点:
支持分布式部署;可跨网络访问;支持多客户端连接;轻量级,使用标准HTTP协议。
缺点:
需要额外的网络配置;相比stdio实现略微复杂;需要考虑网络安全性。
二、前提条件
执行以下示例代码的前提条件如下:
1、Java运行环境。要求JDK版本17+,本人使用的jdk21版本;
2、Java开发工具。本人使用的是IntelliJ IDEA开发工具,需要使用springboot3以上版本。
3、注册阿里云大模型服务,获得api_key。本文采用了阿里巴巴的Qwen大模型进行实验与验证,您也可以选择使用DeepSeek等其它大模型作为替代方案。前提条件是该大模型要支持MCP工具回调。
三、代码实现
1、开发基于sse协议的MCP Server
基于SSE的MCP服务端通过HTTP协议与客户端通信,适用于作为独立服务部署的场景,可以被多个客户端远程调用。
通过Java开发工具创建一个springboot工程,模拟开发一个天气预报服务,通过sse传输协议发布为MCP Server。
(1)maven配置文件
引入spring-ai-mcp-server-webflux-spring-boot-starter,完整pom.xml文件如下:
<?xml version="1.0" encoding="UTF-8"?>
<project xmlns:xsi="http://www.w3.org/2001/XMLSchema-instance"
         xmlns="http://maven.apache.org/POM/4.0.0"
         xsi:schemaLocation="http://maven.apache.org/POM/4.0.0 http://maven.apache.org/xsd/maven-4.0.0.xsd">
    <modelVersion>4.0.0</modelVersion>

    <parent>
        <groupId>org.springframework.boot</groupId>
        <artifactId>spring-boot-starter-parent</artifactId>
        <version>3.3.3</version>
        <relativePath/>
    </parent>

    <groupId>org.example</groupId>
    <artifactId>spring-ai-mcp-sse-server</artifactId>
    <version>1.0-SNAPSHOT</version>

    <properties>
        <maven.compiler.source>21</maven.compiler.source>
        <maven.compiler.target>21</maven.compiler.target>
        <project.build.sourceEncoding>UTF-8</project.build.sourceEncoding>
        <spring-ai.version>1.0.0-M6</spring-ai.version>
        <spring-ai-alibaba.version>1.0.0-M5.1</spring-ai-alibaba.version>
    </properties>

    <dependencyManagement>
        <dependencies>
            <dependency>
                <groupId>org.springframework.ai</groupId>
                <artifactId>spring-ai-bom</artifactId>
                <version>${spring-ai.version}</version>
                <type>pom</type>
                <scope>import</scope>
            </dependency>
        </dependencies>
    </dependencyManagement>

    <dependencies>

        <dependency>
            <groupId>org.springframework.ai</groupId>
            <artifactId>spring-ai-mcp-server-webflux-spring-boot-starter</artifactId>
        </dependency>

    </dependencies>

    <repositories>
        <repository>
            <name>Central Portal Snapshots</name>
            <id>central-portal-snapshots</id>
            <url>https://central.sonatype.com/repository/maven-snapshots/</url>
            <releases>
                <enabled>false</enabled>
            </releases>
            <snapshots>
                <enabled>true</enabled>
            </snapshots>
        </repository>
        <repository>
            <id>spring-milestones</id>
            <name>Spring Milestones</name>
            <url>https://repo.spring.io/milestone</url>
            <snapshots>
                <enabled>false</enabled>
            </snapshots>
        </repository>
        <repository>
            <id>spring-snapshots</id>
            <name>Spring Snapshots</name>
            <url>https://repo.spring.io/snapshot</url>
            <releases>
                <enabled>false</enabled>
            </releases>
        </repository>
    </repositories>

    <build>
        <finalName>${project.artifactId}</finalName>
        <plugins>
            <plugin>
                <groupId>org.springframework.boot</groupId>
                <artifactId>spring-boot-maven-plugin</artifactId>
            </plugin>
        </plugins>
    </build>

</project>
(2)开发天气预报服务类
创建一个Server类,模拟天气预报服务,通过@Tool注解把方法标注为MCP服务接口。
package com.yuncheng.mcp;

import org.slf4j.Logger;
import org.slf4j.LoggerFactory;
import org.springframework.ai.tool.annotation.Tool;
import org.springframework.stereotype.Service;
import java.util.Map;

@Service
public class WeatherService {
    private static final Logger log = LoggerFactory.getLogger(WeatherService.class);
    @Tool(description = "根据城市名称获取天气预报")
    public String getWeatherByCity(String city) {
        log.info("===============getWeatherByCity方法被调用:city="+city);
        Map<String, String> mockData = Map.of(
                "西安", "天气炎热",
                "北京", "晴空万里",
                "上海", "阴雨绵绵"
        );
        return mockData.getOrDefault(city, "抱歉:未查询到对应城市!");
    }

}
(3)注册为MCP工具
将 WeatherService 封装为工具回调提供者(ToolCallbackProvider),便于被MCP Client端发现和调用。
package com.yuncheng.mcp;
import org.springframework.ai.tool.ToolCallbackProvider;
import org.springframework.ai.tool.method.MethodToolCallbackProvider;
import org.springframework.boot.SpringApplication;
import org.springframework.boot.autoconfigure.SpringBootApplication;
import org.springframework.context.annotation.Bean;

@SpringBootApplication
public class McpServerApplication {

    public static void main(String[] args) {
        SpringApplication.run(McpServerApplication.class, args);
    }

    @Bean
    public ToolCallbackProvider weatherTools(WeatherService weatherService) {
        return MethodToolCallbackProvider.builder()
                .toolObjects(weatherService)
                .build();
    }

}
(4)配置yml文件
定义MCP Server的名称、版本号、同步或异步。
server:
  port: 9090  # 服务器端口配置

spring:
  ai:
    mcp:
      server:
        name: spring-ai-mcp-server    # MCP服务器名称
        version: 1.0.0                # 服务器版本号
        type: ASYNC #异步
到这里,一个通过Spring AI创建的MCP Server完成了,访问http://localhost:9090/sse,能看到信息,即表示该服务通过sse发布成功了。
2、开发基于stdio协议的MCP Server
基于stdio的MCP服务端通过标准输入输出流与客户端通信,适用于作为子进程被客户端启动和管理的场景,非常适合嵌入式应用。
通过Java开发工具创建一个springboot工程,模拟开发一个算术计算器服务,通过stdio传输协议发布为MCP Server。
(1)maven配置文件
引入spring-ai-mcp-server-webflux-spring-boot-starter
,完整pom.xml文件如下:
<?xml version="1.0" encoding="UTF-8"?>
<project xmlns:xsi="http://www.w3.org/2001/XMLSchema-instance"
         xmlns="http://maven.apache.org/POM/4.0.0"
         xsi:schemaLocation="http://maven.apache.org/POM/4.0.0 http://maven.apache.org/xsd/maven-4.0.0.xsd">
    <modelVersion>4.0.0</modelVersion>

    <parent>
        <groupId>org.springframework.boot</groupId>
        <artifactId>spring-boot-starter-parent</artifactId>
        <version>3.3.3</version>
        <relativePath/>
    </parent>

    <groupId>org.example</groupId>
    <artifactId>spring-ai-mcp-stdio-server</artifactId>
    <version>1.0-SNAPSHOT</version>

    <properties>
        <maven.compiler.source>21</maven.compiler.source>
        <maven.compiler.target>21</maven.compiler.target>
        <project.build.sourceEncoding>UTF-8</project.build.sourceEncoding>
        <spring-ai.version>1.0.0-M6</spring-ai.version>
        <spring-ai-alibaba.version>1.0.0-M5.1</spring-ai-alibaba.version>
    </properties>

    <dependencyManagement>
        <dependencies>
            <dependency>
                <groupId>org.springframework.ai</groupId>
                <artifactId>spring-ai-bom</artifactId>
                <version>${spring-ai.version}</version>
                <type>pom</type>
                <scope>import</scope>
            </dependency>
        </dependencies>
    </dependencyManagement>

    <dependencies>

        <dependency>
            <groupId>org.springframework.boot</groupId>
            <artifactId>spring-boot-starter-web</artifactId>
        </dependency>

        <dependency>
            <groupId>org.springframework.ai</groupId>
            <artifactId>spring-ai-mcp-server-webflux-spring-boot-starter</artifactId>
        </dependency>

    </dependencies>

    <repositories>
        <repository>
            <name>Central Portal Snapshots</name>
            <id>central-portal-snapshots</id>
            <url>https://central.sonatype.com/repository/maven-snapshots/</url>
            <releases>
                <enabled>false</enabled>
            </releases>
            <snapshots>
                <enabled>true</enabled>
            </snapshots>
        </repository>
        <repository>
            <id>spring-milestones</id>
            <name>Spring Milestones</name>
            <url>https://repo.spring.io/milestone</url>
            <snapshots>
                <enabled>false</enabled>
            </snapshots>
        </repository>
        <repository>
            <id>spring-snapshots</id>
            <name>Spring Snapshots</name>
            <url>https://repo.spring.io/snapshot</url>
            <releases>
                <enabled>false</enabled>
            </releases>
        </repository>
    </repositories>

    <build>
        <finalName>${project.artifactId}</finalName>
        <plugins>
            <plugin>
                <groupId>org.springframework.boot</groupId>
                <artifactId>spring-boot-maven-plugin</artifactId>
            </plugin>
        </plugins>
    </build>

</project>
(2)开发计算器服务类
创建一个Server类,模拟计算器服务,通过@Tool注解把方法标注为MCP服务接口。
package com.yuncheng.mcp;

import org.slf4j.Logger;
import org.slf4j.LoggerFactory;
import org.springframework.ai.tool.annotation.Tool;
import org.springframework.stereotype.Service;

@Service
public class MathService {
    private static final Logger log = LoggerFactory.getLogger(MathService.class);
    @Tool(description = "加法方法")
    public Integer add(Integer a, Integer b) {
        log.info("===============add方法被调用: a={}, b={}", a, b);
        return a + b;
    }

    @Tool(description = "乘法方法")
    public Integer multiply(Integer a, Integer b) {
        log.info("===============multiply方法被调用: a={}, b={}", a, b);
        return a * b;
    }
}
(3)注册为MCP工具
将 MathService封装为工具回调提供者(ToolCallbackProvider),便于被MCP Client端发现和调用。
package com.yuncheng.mcp;

import org.slf4j.Logger;
import org.slf4j.LoggerFactory;
import org.springframework.ai.tool.ToolCallbackProvider;
import org.springframework.ai.tool.method.MethodToolCallbackProvider;
import org.springframework.boot.SpringApplication;
import org.springframework.boot.autoconfigure.SpringBootApplication;
import org.springframework.context.annotation.Bean;

@SpringBootApplication
public class McpServerApplication {

    private static final Logger log = LoggerFactory.getLogger(McpServerApplication.class);

    public static void main(String[] args) {
        SpringApplication.run(McpServerApplication.class, args);
        log.info("===============McpServerApplication服务启动成功");
    }

    @Bean
    public ToolCallbackProvider mathTools(MathService mathService) {
        return MethodToolCallbackProvider.builder()
                .toolObjects(mathService).build();
    }
}
(4)配置yml文件
定义MCP Server的名称、版本号。
spring:
  ai:
    mcp:
      server:
        name: spring-ai-mcp-stdio-server
        version: 1.0.0
(5)配置log日志
在resources目录下,新建一个log日志配置文件logback-spring.xml,目的是记录MCP Server端的接口是否被调用。
<configuration>
    <appender name="FILE" class="ch.qos.logback.core.FileAppender">
        <file>mcp-server.log</file>
        <encoder>
            <pattern>%d{yyyy-MM-dd HH:mm:ss} [%thread] %-5level %logger{36} - %msg%n</pattern>
        </encoder>
    </appender>

    <root level="INFO">
        <appender-ref ref="FILE" />
    </root>
</configuration>
到这里,一个通过Spring AI创建的MCP Server完成了。stdio方式是server和client通过进程通信,所以需要把server打包成jar,以便client命令启动执行。
通过maven工具打包即可,我打包后路径为:D:\java\ai-project-web\spring-ai-mcp-stdio-server\target\spring-ai-mcp-stdio-server.jar。
测试该服务是否发布成功,在cmd命令行窗口里输入如下命令:
java -Dspring.ai.mcp.server.stdio=true -Dspring.main.web-application-type=none -Dspring.main.banner-mode=off -jar D:/java/ai-project-web/spring-ai-mcp-stdio-server/target/spring-ai-mcp-stdio-server.jar 验证服务是否启动成功。
至此,我们通过spring ai框架开发完成了2个MCP Server服务,一个通过sse协议发布,另一个通过stdio协议发布,接下来,开发一个MCP Client端,调用这两个MCP Server服务。
3、开发MCP Client调用MCP Server
Spring AI 提供了更简便的方式来使用MCP,通过starter可以大大简化MCP客户端的配置和使用。Spring AI MCP支持两种不同的传输层实现:基于stdio的实现和基于SSE的实现。
通过Java开发工具,创建一个springboot工程,开发MCP Client。
(1)maven配置文件
引入spring-ai-mcp-client-webflux-spring-boot-starter和spring-ai-alibaba-starter,完整pom.xml文件如下:
<?xml version="1.0" encoding="UTF-8"?>
<project xmlns="http://maven.apache.org/POM/4.0.0"
         xmlns:xsi="http://www.w3.org/2001/XMLSchema-instance"
         xsi:schemaLocation="http://maven.apache.org/POM/4.0.0 http://maven.apache.org/xsd/maven-4.0.0.xsd">
    <modelVersion>4.0.0</modelVersion>
    <parent>
        <groupId>org.springframework.boot</groupId>
        <artifactId>spring-boot-starter-parent</artifactId>
        <version>3.3.3</version>
        <relativePath/>
    </parent>

    <groupId>org.example</groupId>
    <artifactId>spring-ai-mcp-client</artifactId>
    <version>1.0-SNAPSHOT</version>

    <properties>
        <maven.compiler.source>21</maven.compiler.source>
        <maven.compiler.target>21</maven.compiler.target>
        <project.build.sourceEncoding>UTF-8</project.build.sourceEncoding>
        <spring-ai.version>1.0.0-M6</spring-ai.version>
        <spring-ai-alibaba.version>1.0.0-M6.1</spring-ai-alibaba.version>
    </properties>

    <dependencyManagement>
        <dependencies>
            <dependency>
                <groupId>org.springframework.ai</groupId>
                <artifactId>spring-ai-bom</artifactId>
                <version>${spring-ai.version}</version>
                <type>pom</type>
                <scope>import</scope>
            </dependency>
        </dependencies>
    </dependencyManagement>

    <dependencies>

        <dependency>
            <groupId>org.springframework.boot</groupId>
            <artifactId>spring-boot-starter-web</artifactId>
        </dependency>

        <dependency>
            <groupId>org.springframework.ai</groupId>
            <artifactId>spring-ai-mcp-client-webflux-spring-boot-starter</artifactId>
        </dependency>

        <dependency>
            <groupId>com.alibaba.cloud.ai</groupId>
            <artifactId>spring-ai-alibaba-starter</artifactId>
            <version>${spring-ai-alibaba.version}</version>
        </dependency>

    </dependencies>

    <repositories>
        <repository>
            <name>Central Portal Snapshots</name>
            <id>central-portal-snapshots</id>
            <url>https://central.sonatype.com/repository/maven-snapshots/</url>
            <releases>
                <enabled>false</enabled>
            </releases>
            <snapshots>
                <enabled>true</enabled>
            </snapshots>
        </repository>
        <repository>
            <id>spring-milestones</id>
            <name>Spring Milestones</name>
            <url>https://repo.spring.io/milestone</url>
            <snapshots>
                <enabled>false</enabled>
            </snapshots>
        </repository>
        <repository>
            <id>spring-snapshots</id>
            <name>Spring Snapshots</name>
            <url>https://repo.spring.io/snapshot</url>
            <releases>
                <enabled>false</enabled>
            </releases>
        </repository>
    </repositories>

    <build>
        <finalName>${project.artifactId}</finalName>
        <plugins>
            <plugin>
                <groupId>org.springframework.boot</groupId>
                <artifactId>spring-boot-maven-plugin</artifactId>
            </plugin>
        </plugins>
    </build>

</project>
(2)开发MCP Client
package com.yuncheng.mcp;

import org.springframework.ai.chat.client.ChatClient;
import org.springframework.boot.CommandLineRunner;
import org.springframework.boot.SpringApplication;
import org.springframework.boot.autoconfigure.SpringBootApplication;
import org.springframework.context.ConfigurableApplicationContext;
import org.springframework.context.annotation.Bean;
import org.springframework.ai.tool.ToolCallbackProvider;

import java.util.Scanner;

@SpringBootApplication
public class McpClientApplication {

    public static void main(String[] args) {
        SpringApplication.run(McpClientApplication.class, args);
    }

    @Bean
    public CommandLineRunner predefinedQuestions(ChatClient.Builder chatClientBuilder,
                                                 ToolCallbackProvider tools,
                                                 ConfigurableApplicationContext context) {
        return args -> {
            // 构建ChatClient并注入MCP工具
            var chatClient = chatClientBuilder
                    .defaultTools(tools)
                    .build();

            // 创建Scanner对象用于接收用户输入
            Scanner scanner = new Scanner(System.in);

            System.out.println(">>> 欢迎使用问答系统!输入'exit'退出程序。");

            while (true) {
                // 提示用户输入问题
                System.out.print("\n>>> QUESTION: ");
                String userInput = scanner.nextLine();

                // 如果用户输入"exit",则退出循环
                if ("exit".equalsIgnoreCase(userInput)) {
                    System.out.println(">>> 已退出问答系统。");
                    break;
                }

                // 使用ChatClient与LLM交互
                try {
                    System.out.println("\n>>> ASSISTANT: " + chatClient.prompt(userInput).call().content());
                } catch (Exception e) {
                    System.out.println("\n>>> ERROR: 无法处理您的请求,请稍后再试。");
                    e.printStackTrace();
                }
            }

            // 关闭Spring上下文
            context.close();
            scanner.close();
        };
    }
}
(3)配置yml文件
server:
  port: 8080

spring:
  ai:
    mcp:
      client:
        type: ASYNC
        sse:
          connections:
            server1:
              url: http://localhost:9090
        stdio:
          connections:
            server2:
              command: java
              args:
                - -Dspring.ai.mcp.server.stdio=true
                - -Dspring.main.web-application-type=none
                - -Dspring.main.banner-mode=off
                - -jar
                - D:/java/ai-project-web/spring-ai-mcp-stdio-server/target/spring-ai-mcp-stdio-server.jar
    dashscope:
      api-key: sk-b90ad31bb3eb4a158524928354f31dc5
      chat:
        options:
          model: qwen-plus
本配置文件定义了一个基于 Spring AI 的异步 MCP 客户端,调用了SSE 和 Stdio 两种MCP服务,server1采用SSE方式,连接指向http://localhost:9090,server1采用Stdio 方式,Stdio 通过 Java 命令启动,指定 Jar 文件位置。同时集成了阿里巴巴大模型qwen-plus。读者需要把api-key替换为自己的key进行测试验证。
四、运行测试
先启动MCP Server服务,再运行MCP Client,进行AI对话,观察日志输出结果,确定是否理解了用户的输入信息,并分别调用了对应的MCP Server服务。
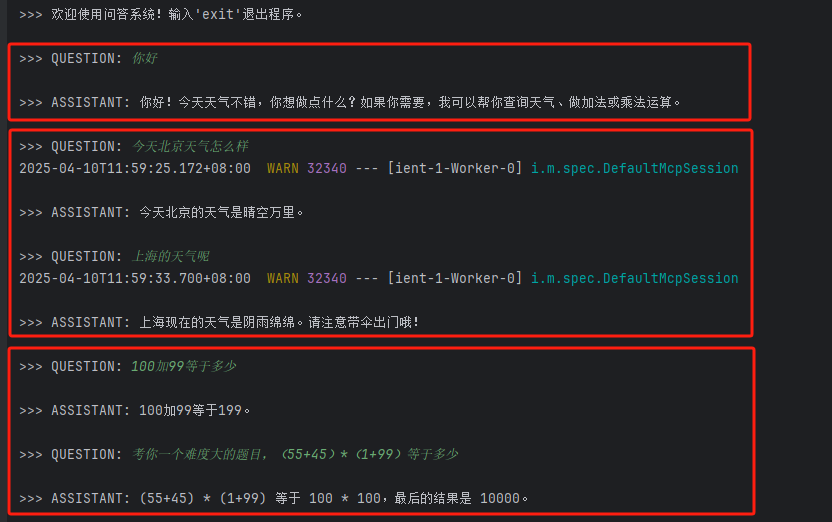
观察输出结果:
(1)提问“你好”,大模型回答:“你好!今天天气不错,你想做点什么?如果你需要,我可以帮你查询天气、做加法或乘法运算。”
说明大模型已经发现了天气预报、算术运算两个MCP服务。
(2)提问“今天北京天气怎么样”,大模型的回答调用了基于sse协议的MCP Server,可以到该服务后台查看日志,确定是否被调用。
(3)提问“(55+45)*(1+99)等于多少”,大模型的回答调用了基于stdio协议的MCP Server,可以到mcp-server.log日志文件中查看日志,确定是否被调用。
通过验证结果表明:大模型根据用户的提问,选择了合适的工具进行回答,分别调用了对应的MCP Server服务。
那么,AI大模型是如何实现Tool Call的呢?以下是Spring AI实现Tool Call的原理图:
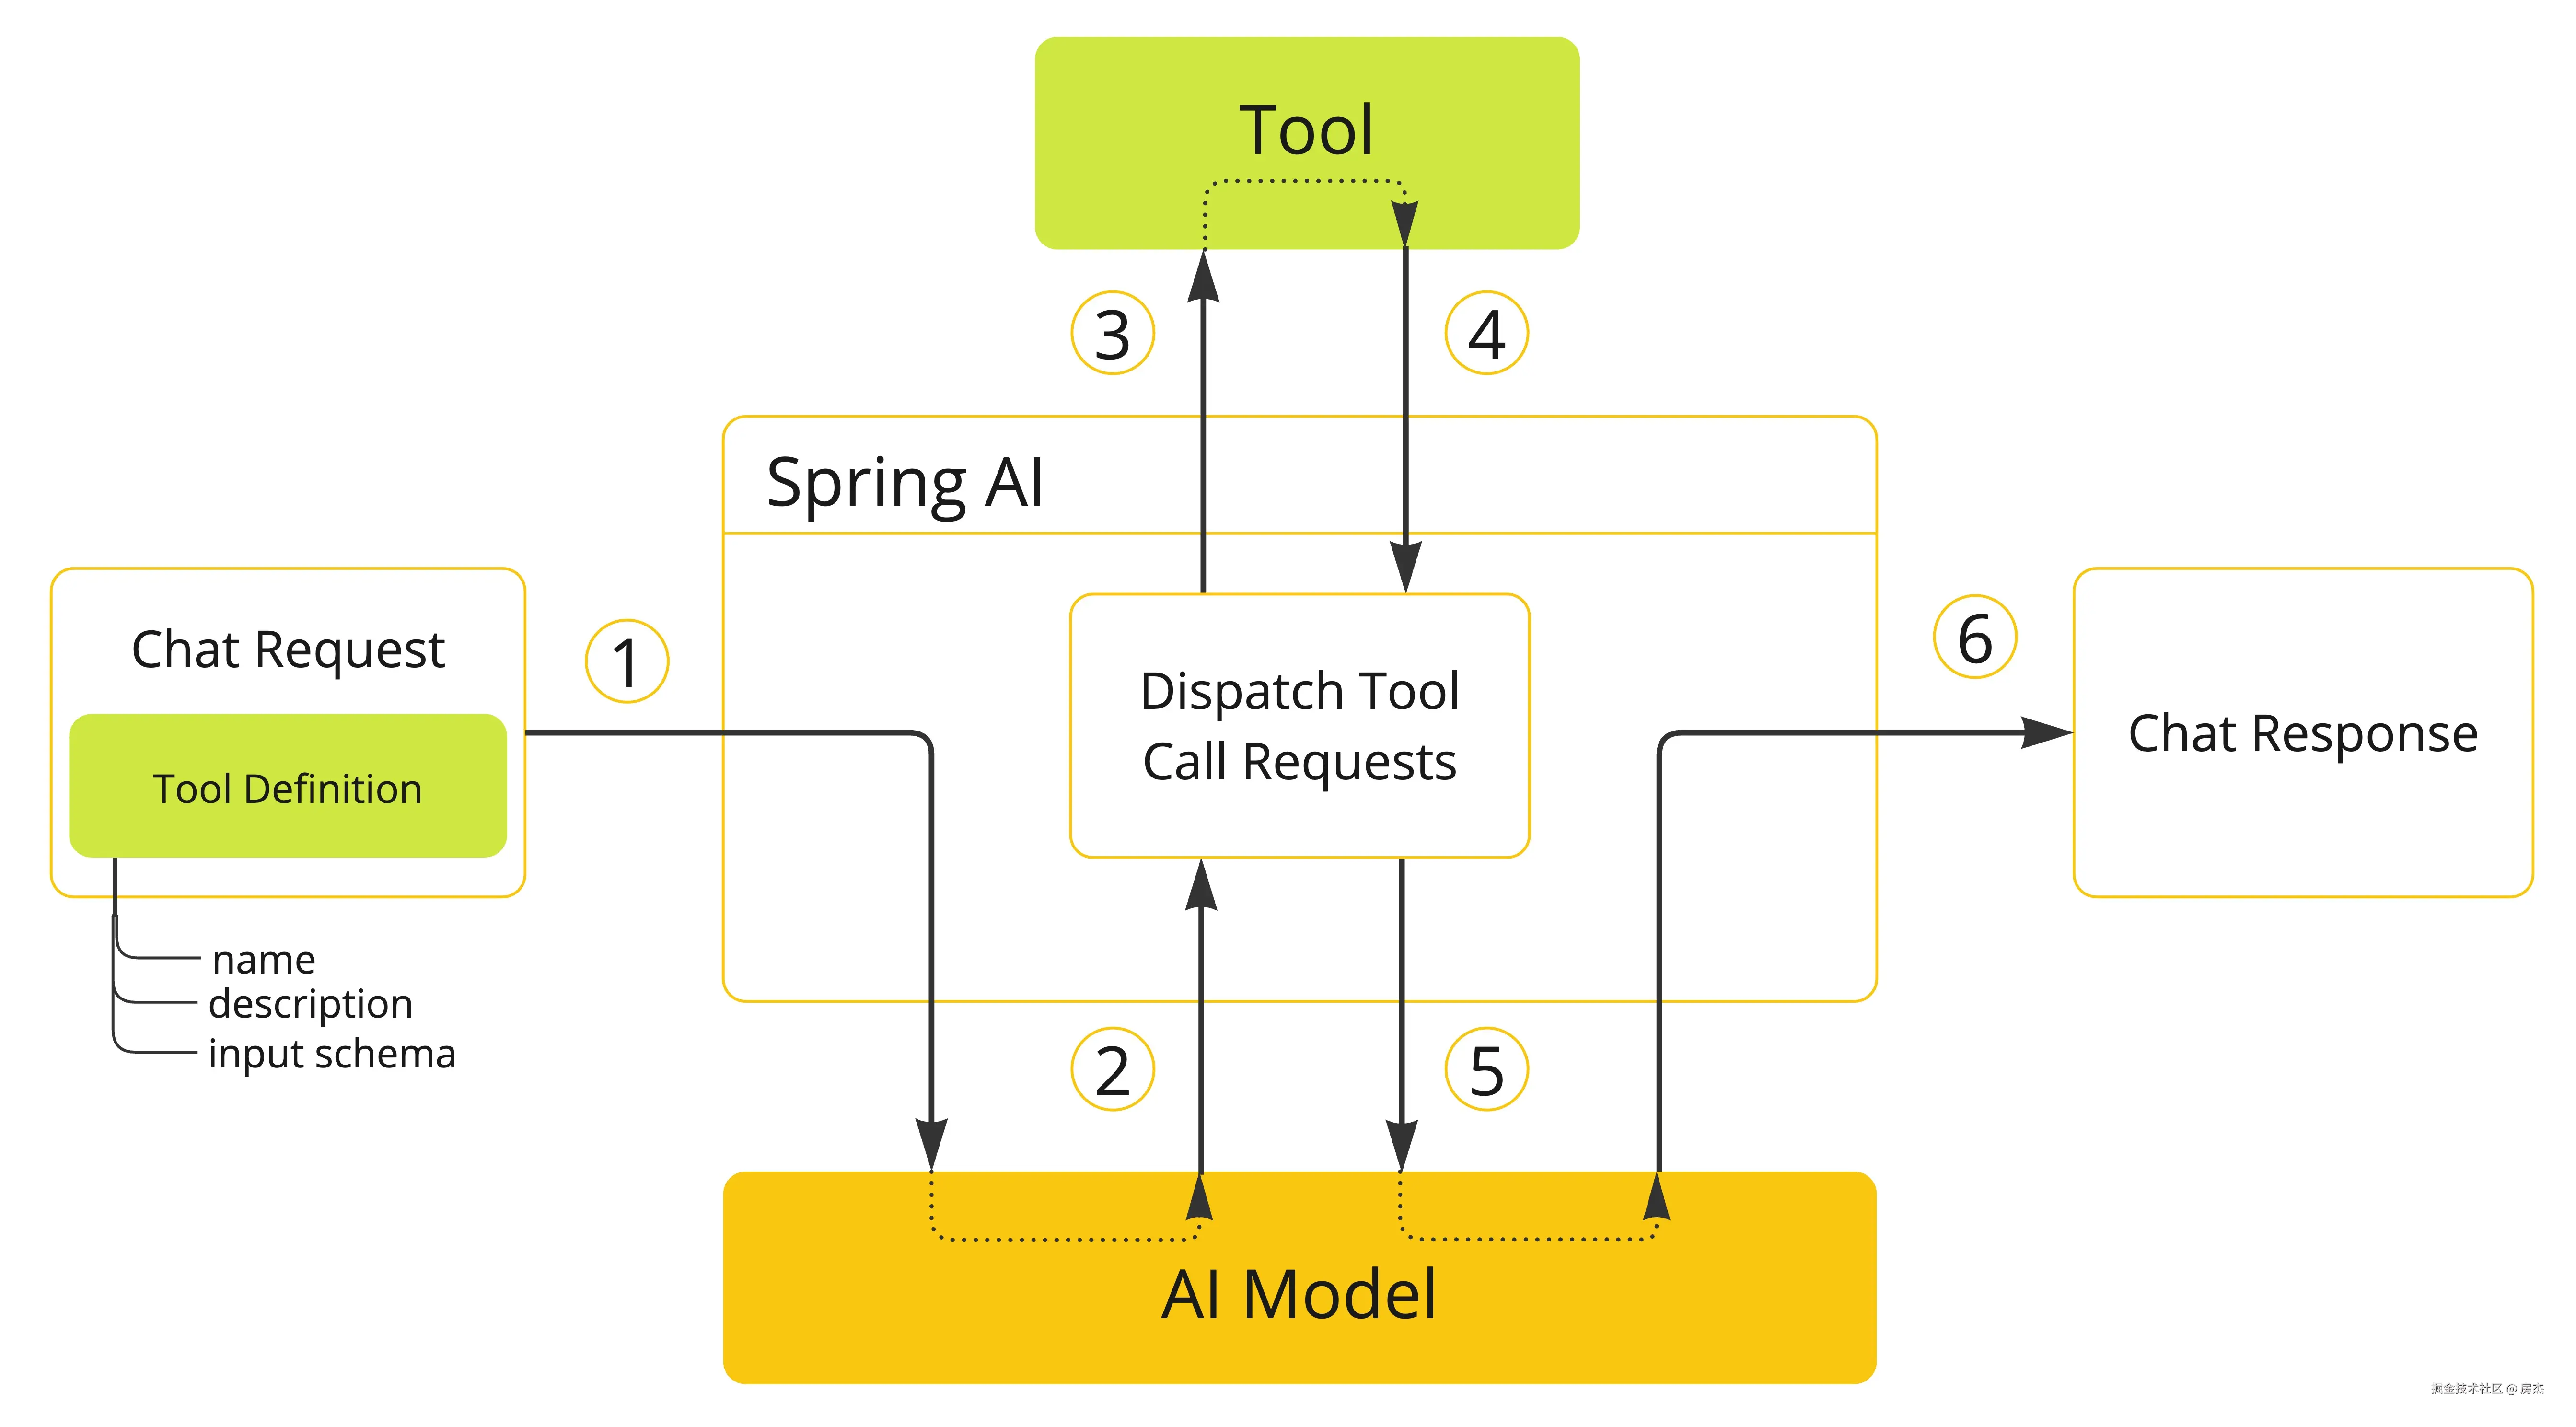
在最近发布的 Spring AI 1.0.0.M6 版本中,其中一个重大变化是 Function Calling 被废弃,被 Tool Calling 取代。
五、总结
Spring AI MCP Server Starter提供了两种实现MCP服务端的方式:基于stdio的实现和基于SSE的实现。基于stdio的实现适用于嵌入式场景,而基于SSE的实现适用于独立服务部署。
通过使用@Tool注解和@ToolParameter注解,可以轻松地将普通的Java方法转换为MCP工具,使其可以被MCP客户端发现和调用。Spring Boot的自动配置机制使得MCP服务端的开发变得简单高效。
智能体开发平台在线体验:http://www.yunchengxc.com
文章中示例工程源代码:https://gitee.com/hibpm/spring-ai-mcp-demo