本文为视觉 SLAM 的学习总结,讲解 3D-2D 之直接线性方法(DLA)。欢迎交流
理论
3D-2D 是指,我们得到的两张图中,第一张图像存在深度信息,即已知 。
可以这样理解:我们从第一个位置看到一个点的坐标,又从第二个位置看到同一个点。可以根据这个匹配关系求解出相加的位姿。
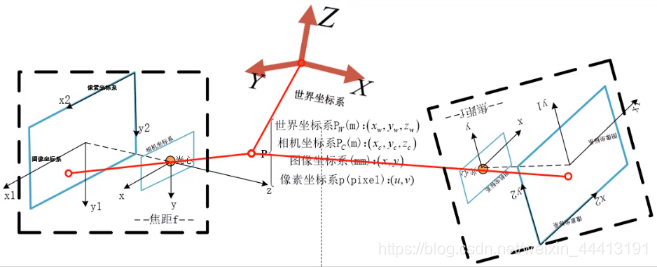
回顾相机模型中对【4 个坐标系的总结】,我们可以将世界坐标固定到第一个位置,这样相当于求解第二个位置在相机坐标系中的位姿即可。我们从像素坐标到世界坐标的公式为:
因此在上图中,我们得到的关系为:
这里
为未知量,即变换矩阵
。为运算的合法性且最后一行信息无效,我们只取变换矩阵的前三行。在上面的公式中,我们已知
和匹配点在第一个图像中的相机坐标(通过坐标系变换,详见【4 个坐标系的总结】),即世界坐标系。因为是齐次坐标运算,因此
的因子可以省略,未知量只有
的变换矩阵。
实践
这里我们需要用到两张原始图片和第一张图片的深度图。首先读取图像并进行特征匹配:
Mat img_1 = imread ( argv[1], CV_LOAD_IMAGE_COLOR );
Mat img_2 = imread ( argv[2], CV_LOAD_IMAGE_COLOR );

vector<KeyPoint> keypoints_1, keypoints_2;
vector<DMatch> matches;
find_feature_matches ( img_1, img_2, keypoints_1, keypoints_2, matches );
cout<<"一共找到了"<<matches.size() <<"组匹配点"<<endl;
然后读取一张深度图,将深度信息与第一张图片的匹配点结合建立 3D 信息。将第一张图的像素坐标转换为相机坐标,这里需要传入内参、像素坐标,即可求出相机坐标:
Mat d1 = imread ( argv[3], CV_LOAD_IMAGE_UNCHANGED );       // 深度图为16位无符号数,单通道图像
Mat K = ( Mat_<double> ( 3,3 ) << 520.9, 0, 325.1, 0, 521.0, 249.7, 0, 0, 1 );
vector<Point3f> pts_3d;
vector<Point2f> pts_2d;
for ( DMatch m:matches )
{
    ushort d = d1.ptr<unsigned short> (int ( keypoints_1[m.queryIdx].pt.y )) [ int ( keypoints_1[m.queryIdx].pt.x ) ];
    if ( d == 0 )   // bad depth
        continue;
    float dd = d/5000.0;
    Point2d p1 = pixel2cam ( keypoints_1[m.queryIdx].pt, K ); // 像素坐标转相机
    pts_3d.push_back ( Point3f ( p1.x*dd, p1.y*dd, dd ) ); // 第一帧图像(世界坐标)
    pts_2d.push_back ( keypoints_2[m.trainIdx].pt ); // 第二帧图像的像素坐标
}
在这里我们看一下函数 pixel2cam 的实现:
Point2d pixel2cam ( const Point2d& p, const Mat& K ){
    return Point2d
           (
               ( p.x - K.at<double> ( 0,2 ) ) / K.at<double> ( 0,0 ),
               ( p.y - K.at<double> ( 1,2 ) ) / K.at<double> ( 1,1 )
           );
}
回到 main 函数,我们在在函数 solvePnP 中传入前面求出的第一帧的相机坐标和第二帧的像素坐标以及匹配点关系就可以求出相机的位姿:
Mat r, t;
solvePnP ( pts_3d, pts_2d, K, Mat(), r, t, false ); // 调用OpenCV 的 PnP 求解,可选择EPNP,DLS等方法
Mat R;
cv::Rodrigues ( r, R ); // r为旋转向量形式,用Rodrigues公式转换为矩阵

cout<<"R="<<endl<<R<<endl;
cout<<"t="<<endl<<t<<endl;