一、vLLM 介绍
vLLM是一个快速且易于使用的大模型库,专为大模型的推理和部署而设计。可以无缝集成 HuggingFace、Modelscope 上的模型。
在性能优化上 vLLM 通过引入创新的架构和算法,如Paged Attention、动态张量并行等,减少计算开销和提高吞吐量,实现推理过程的高效,从而加速LLM在推理阶段的性能。一定程度上解决了传统大模型在硬件资源有限情况下的性能瓶颈。
文章最后给出了vLLM推理和 Huggleface 的 transformers推理的性能对比。
vLLM GitHub地址:
官方文档地址:
https://docs.vllm.ai/en/latest/getting_started/quickstart.html
安装 vLLM:
pip install vllm
下面测试所使用的依赖版本如下:
vllm==0.6.6.post1
torch==2.5.1
transformers==4.48.0
huggingface-hub==0.27.1
二、vLLM 批量离线推理任务
批量离线推理主要涉及到两个类,LLM用来加载目标模型 、SamplingParams用来设置采样参数,模型这里以:Qwen/Qwen2.5-1.5B-Instruct 进行测试:
import os
import torch
# 使用 modescope 下载模型
os.environ['VLLM_USE_MODELSCOPE'] = 'True'
from vllm import LLM, SamplingParams

prompts = [
    "你好, 介绍下你自己?",
    "你会做什么?",
    "你擅长什么任务?",
    "什么是大模型?",
]
# 设置采样参数
sampling_params = SamplingParams(temperature=0.8, top_p=0.95)
# 加载模型
llm = LLM(model="Qwen/Qwen2.5-1.5B-Instruct", dtype=torch.float16, trust_remote_code=True)
# 推理
outputs = llm.generate(prompts, sampling_params)

for output in outputs:
    prompt = output.prompt
    generated_text = output.outputs[0].text
    print(f"Prompt: {

      prompt!r}, Generated text: {

      generated_text!r}")
注意,如果模型不存在的话 vLLM 默认会去 huggleface 上下载模型,如果网络不友好的话,可以选择使用 modelscope,但需要指定环境变量 VLLM_USE_MODELSCOPE 为 True
模型不存在,自动下载:

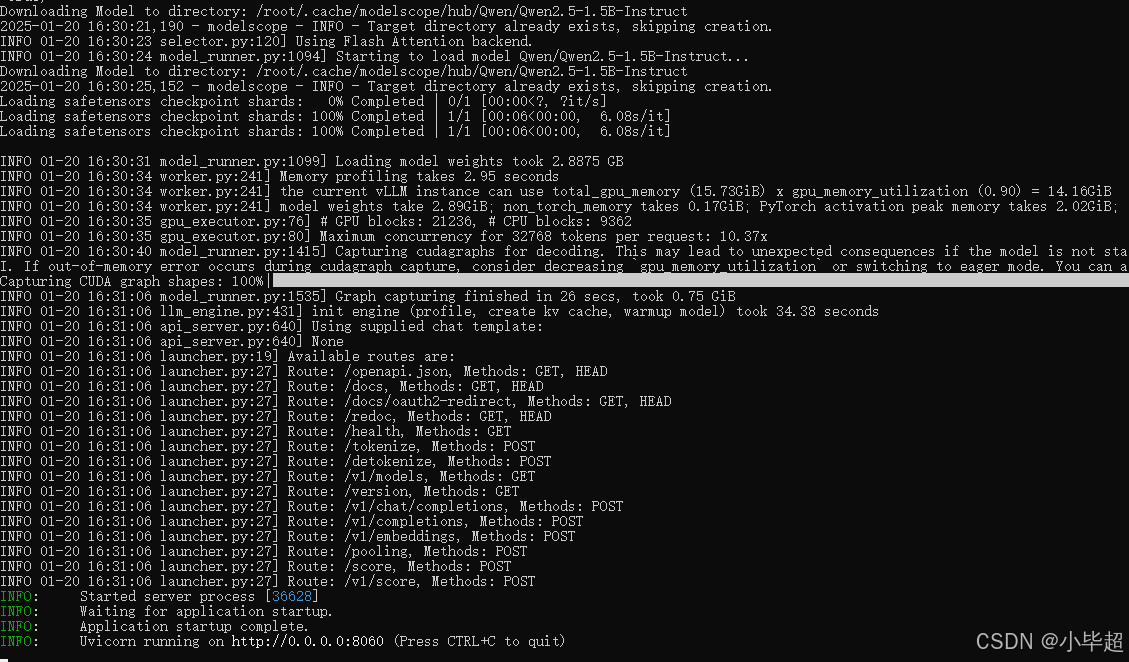
最后运行结果:

三、vLLM 部署API推理服务
安装好 vLLM 依赖后,就可以使用 vllm 指令快速部署模型,可以使用下面指令查看帮助:
vllm -h
vllm -serve -h
例如还是部署 Qwen/Qwen2.5-1.5B-Instruct 模型,服务端口使用 8060 端口:
export VLLM_USE_MODELSCOPE=True

vllm serve Qwen/Qwen2.5-1.5B-Instruct \
  --port 8060 \
  --dtype float16 \
  --trust-remote-code
同样注意,如果网络连接 huggleface 不友好,请指定 export VLLM_USE_MODELSCOPE=True 使用 modelscope 上的模型
下面就可以像访问第三方在线API接口的方式访问就可以了,例如查询支持的模型:
curl http://localhost:8060/v1/models

OpenAI Completions API 请求模式测试:
curl http://localhost:8060/v1/completions \
    -H "Content-Type: application/json" \
    -d '{
        "model": "Qwen/Qwen2.5-1.5B-Instruct",
        "prompt": "你好,介绍一下你自己",
        "max_tokens": 50,
        "temperature": 0.5
    }'

服务端打印日志:

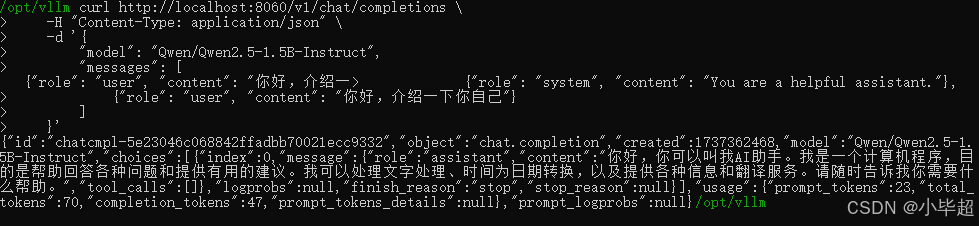
OpenAI Chat API 请求模式测试:
curl http://localhost:8060/v1/chat/completions \
    -H "Content-Type: application/json" \
    -d '{


        "model": "Qwen/Qwen2.5-1.5B-Instruct",
        "messages": [
            {

    "role": "system", "content": "You are a helpful assistant."},
            {

    "role": "user", "content": "你好,介绍一下你自己"}
        ]
    }'
Python openai 函数库访问测试:
pip install openai
from openai import OpenAI

openai_api_key = "EMPTY"
openai_api_base = "http://localhost:8060/v1"

client = OpenAI(
    api_key=openai_api_key,
    base_url=openai_api_base,
)

response = client.chat.completions.create(
    model="Qwen/Qwen2.5-1.5B-Instruct",
    messages=[
        {

    "role": "system", "content": "You are a helpful assistant."},
        {

    "role": "user", "content": "你好,介绍一下你自己"},
    ]
)
print(response)
四、API推理服务使用 api-key
我们在访问第三方在线API大模型接口时,一般都需要申请一个 api-key,请求时放在 header 里发送至服务端,但上面客户端请求服务并没有这步验证,为了安全起见可以启动服务的时候指定访问的 api-key 。
例如:
export VLLM_USE_MODELSCOPE=True

vllm serve Qwen/Qwen2.5-1.5B-Instruct \
  --port 8060 \
  --dtype float16 \
  --trust-remote-code \
  --api-key token-abc123
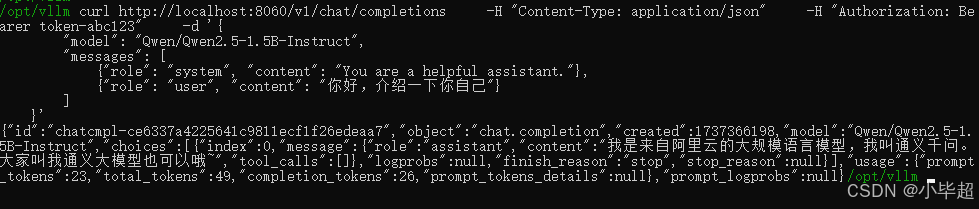
访问时,如果没有携带 api-key ,则会返回 401 Unauthorized:

携带正确的 api-key 则可以正常访问:
curl http://localhost:8060/v1/chat/completions \
    -H "Content-Type: application/json" \
    -H "Authorization: Bearer token-abc123" \
    -d '{


        "model": "Qwen/Qwen2.5-1.5B-Instruct",
        "messages": [
            {

    "role": "system", "content": "You are a helpful assistant."},
            {

    "role": "user", "content": "你好,介绍一下你自己"}
        ]
    }'
五、vLLM 部署Embedding向量模型
vLLM 不仅支持生成模型,同样对一些 pooling 任务模型也提供支持,例如:嵌入 embed、分类 classify、句对评分score、奖励建模reward 等,对于不同任务的选择可以通过 --task 选项设置,这里以常用的 Embedding向量任务为例,模型使用BAAI/bge-large-zh-v1.5 进行测试。
官方不同任务的介绍:
Embedding 任务的使用介绍:
https://docs.vllm.ai/en/latest/serving/openai_compatible_server.html#embeddings-api
5.1 线推理方式
import os
os.environ['VLLM_USE_MODELSCOPE'] = 'True'
from vllm import LLM

## task可选 auto,generate,embedding,embed,classify,score,reward, default: “auto”
llm = LLM(model="BAAI/bge-large-zh-v1.5", trust_remote_code=True, task="embed")
(output,) = llm.embed("你好,小毕超!")
embeds = output.outputs.embedding
print(f"Embeddings: {

      embeds!r} (size={

      len(embeds)})")

5.2 部署在线 Embedding API 服务
export VLLM_USE_MODELSCOPE=True

vllm serve BAAI/bge-large-zh-v1.5 \
  --port 8070 \
  --dtype auto \
  --task embed \
  --trust-remote-code \
  --api-key token-abc123
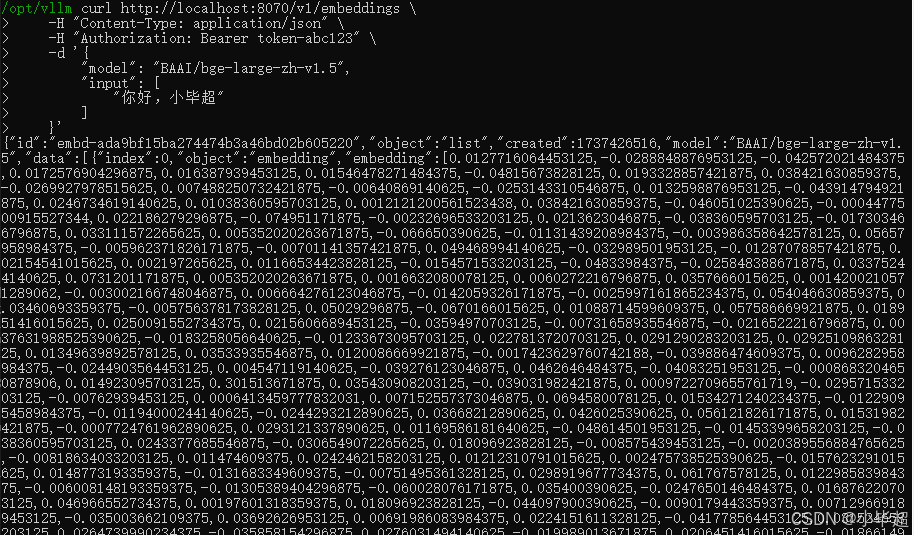
访问测试:
curl http://localhost:8070/v1/embeddings \
    -H "Content-Type: application/json" \
    -H "Authorization: Bearer token-abc123" \
    -d '{
        "model": "BAAI/bge-large-zh-v1.5",
        "input": [
            "你好,小毕超"
        ]
    }'
六、vLLM VS Huggleface 测试对比
前面已经基本了解了 vLLM 的使用,那具体 vLLM 的性能有多强呢,接下来,分别测试下 vLLM 批量推理和 Huggleface transformers 批量推理性能对比。
分别对相同的输入推理10次,观察每次的显存占用、推理时间和整体耗时。
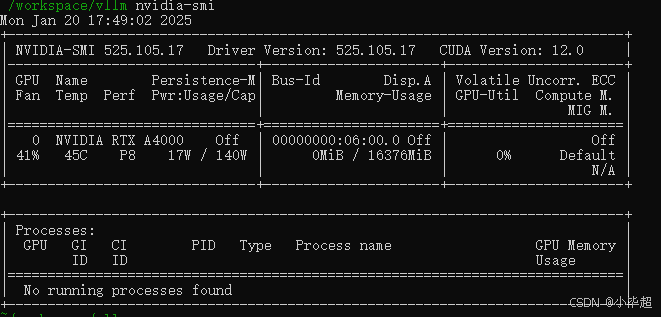
测试所使用机器配置为 RTX A4000 16G显存:
6.1 vllm 推理测试:
import os, time

os.environ['VLLM_USE_MODELSCOPE'] = 'True'
from vllm import LLM, SamplingParams
import torch

llm = LLM(model="Qwen/Qwen2.5-1.5B-Instruct", dtype=torch.float16, trust_remote_code=True)

prompts = [
    "你好, 介绍下你自己?",
    "你会做什么?",
    "你擅长什么任务?",
    "什么是大模型?",
]
sampling_params = SamplingParams(temperature=0.8, top_p=0.95)
print("===================vLLM Start==============================")
t = time.time()
for i in range(10):
    item_t = time.time()
    outputs = llm.generate(prompts, sampling_params)
    for output in outputs:
        prompt = output.prompt
        generated_text = output.outputs[0].text
    print(f"vllm {i} batch use time: ", (time.time() - item_t))
print("vllm total use time:", (time.time() - t))
print("===================vLLM End==============================")
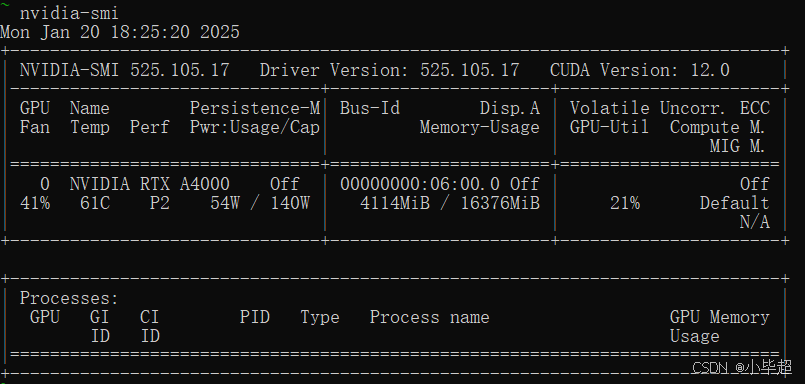
运行期间使用显存:

运行处理结果:
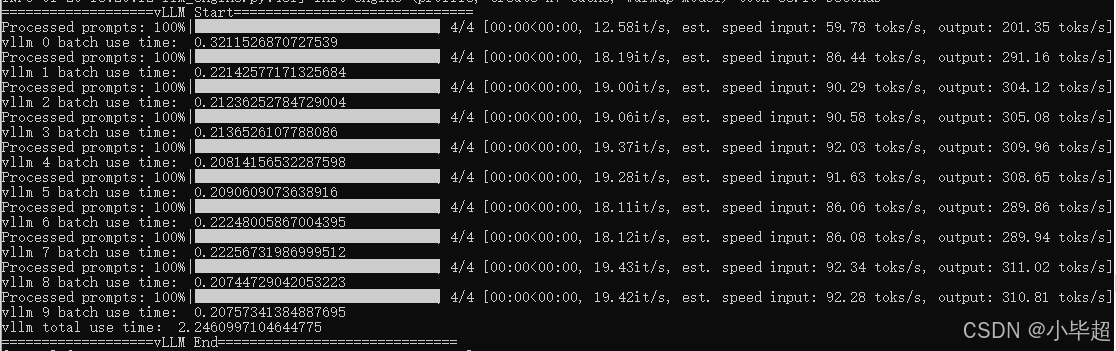
vLLM运行期间使用显存约13G,平均每个批次用时:0.2s,整体耗时:2.24s 。
6.2 transformers 推理测试:
import time
import torch
from transformers import pipeline

model_name = "Qwen/Qwen2.5-1.5B-Instruct"
generator = pipeline('text-generation', model=model_name, device=0, torch_dtype=torch.float16)

prompts = [
    "你好, 介绍下你自己?",
    "你会做什么?",
    "你擅长什么任务?",
    "什么是大模型?",
]
sampling_params = {


    'temperature': 0.8,
    'top_p': 0.95,
    'max_length': 256,
}
print("===================transformers Start==============================")
t = time.time()
for i in range(10):
    item_t = time.time()
    outputs = generator(prompts, **sampling_params)
    for output in outputs:
        generated_text = output[0]['generated_text']
    print(f"transformers {

      i} batch use time: ", (time.time() - item_t))
print("transformers total use time:", (time.time() - t))
print("===================transformers End==============================")
运行期间消耗显存:
运行处理结果:
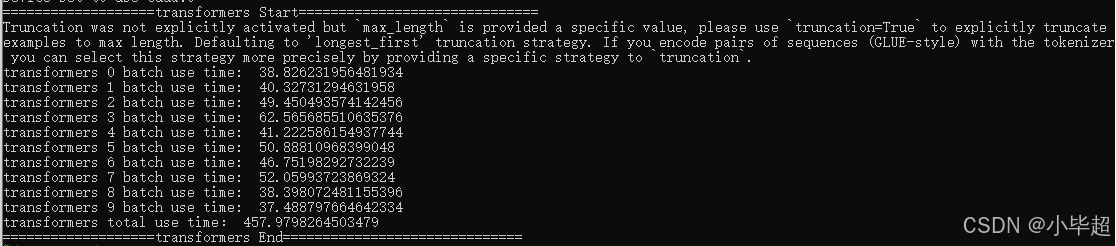
transformers 运行期间使用显存约4G,平均每个批次用时:45s,整体耗时:457.97s 。
6.3 总结
| 使用显存 | 单个批次用时 | 整体用时 | |
|---|---|---|---|
| vLLM | 13G | 0.2s | 2.24s |
| transformers | 4G | 45s | 457.97s |
因此对比下来,vLLM 以空间换速度的方式,在推理效率上具有显著优势,大概是transformers的204倍,但牺牲了更多的显存资源。而 transformers 推理速度较慢,但显存使用较少。